Brother printer keep disconnecting from wifi

I recently had a client call up saying their Brother printer keeps disconnecting from wifi. The client seemed to think it happens at random intervals and restarting the printer fixes the problem for a short period.

For starters I know that this printer uses 2.4GHz for wifi connection, and if the Brother printer continually disconnects it could be due to channel interference.

The first thing I checked was the wifi signal strength, 2.4GHz channel utilisation and latency to the Brother printer and other wifi devices on the 2.4GHz network.

I found that the channel wasn't being utilised by neighboring wifi access points but I did found that the latency to the Brother printer was erroneous and high. Usually this indicate channel interference so I decided to change the wifi channel in any case.

Unfortunately the wifi channel change did not make a difference to the erroneous pings to the Brother printer.

I then proceeded to update the Brother printer firmware, which again did not make a difference to the erroneous pings.

Either the erroneous latency to the Brother printer whilst connected to wifi is normal or  there is a component failure on the Brother printer, mind you another option is that the cpu on the printer is running at or close to its max.

Scouring through the internet it seems it was not unusual for users with Brother printers to have constant wifi disconnect issues.

How to fix Brother printer wont stay connected to wifi issues

The fix is rather unusual and seems to resolve the issue with Brother printers constantly disconnecting from wifi.

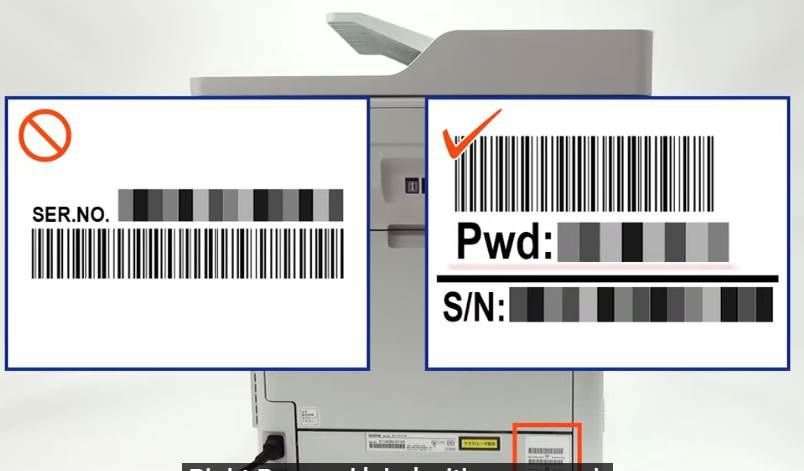
On the back of your Brother printer is a label with a password to access the web interface. Make note of this password and connect to the web interface via the IP address.

An easy way to find your printer IP address is to have a look at the settings > network > wifi > IP section

Once you have logged in to the Brother web interface, head over to Network > Wireless > IPv6 and check the enabled option.

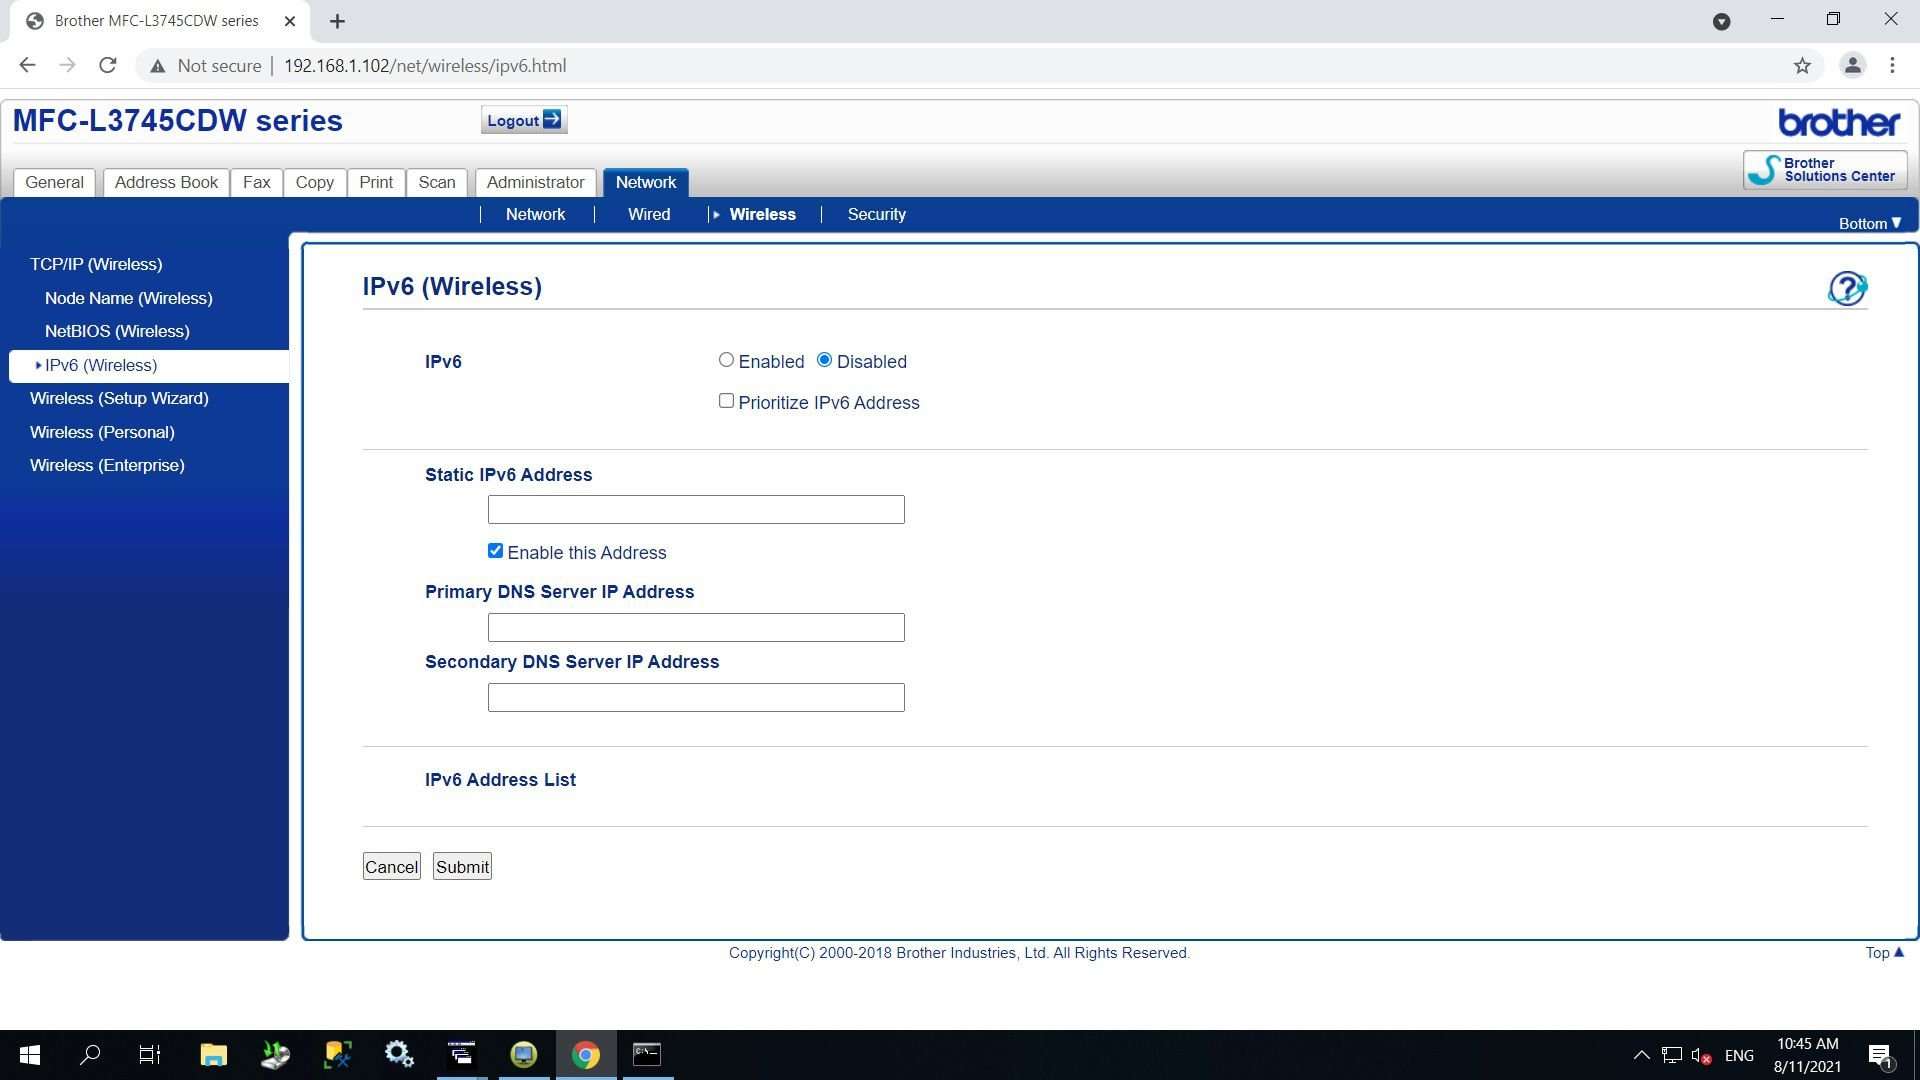
The Brother printer should restart and hopefully stay connected to wifi.


Intel NUC Does Not Power On


Intel NUC is a small form factor computer with a tiny footprint. Short for Next Unit of Computing, Intel NUC puts full-sized PC power in the palm of your hand. These units are my go to for business use as they screw right on to the back of any monitor with VESA mount holes.

The Intel NUC computers are very reliable but on occasion you might run in to an issue where you might need troubleshooting tips, here are some:

Intel NUC Powers On Then Off Again

This particular problem I have encountered quite recently where the Intel NUC was working fine for almost a year and then suddenly developed the issue where if you turn it on, the fan would spin at full speed and then about 8 seconds later the Intel NUC powers off again.

I tested the power supply, swapped out memory and SSD drive but the issue persisted.

In the end I send the unit back to the manufacturer for replacement.

Intel NUC Troubleshooting Tips

The first thing I look at is the power source, is the adapter and cable still in good condition or is there break points in the cable? I'll use a multimeter to check the voltage, on newer NUC's the adapter output voltage should be 19Volts.

Second, look for any POST error indicators, plug a speaker into the headphone jack to hear audible error beeps.

Blink Codes and Beep Codes for Intel NUC:

1 blink every 5 seconds. Power-on circuit may have failed. Contact Intel Customer Support for assistance.

3 blinks (3 beeps), On-off (1.0 second each) three times, then 2.5-second pause (off). The pattern repeats until the computer is powered off.
Things to try:
Remove and reseat the memory.
Make sure the contacts on the memory and the socket are clean.
Check for a faulty memory module by trying the memory in a known good system.
If the Intel NUC has two memory slots:

Try using just one memory module at a time, swapping it between the upper and lower memory slots.
Try using memory modules from the same manufacturer with the same part number and speed.
It's rare that this blink pattern would appear on an Intel NUC that has the memory modules soldered down on the board. If it does, it likely means the soldered down memory has failed. In this case, contact Intel Customer support.

16 on/off blinks (8 beeps). 0.25 seconds on, 0.25 seconds off, 0.25 seconds on, 0.25 seconds off, for a total of 16 blinks. Then the computer shuts down.
Cpu thermal issue. Check that chassis ventilation holes are not blocked and unit has sufficient airflow.

Also, try the Intel NUC No Boot Troubleshooting Wizard

In some cases the above steps might not help and could be caused by a faulty component on the motherboard. If you have swapped out memory modules/s and HDD/SDD drives and the issue persists it could be related to motherboard failure. In this case it would be best to get in touch with Intel support.


Intel NUC Over-Temperature Condition

I had a client call me up saying their near new Intel i5 10th Gen Nuc was occasionally coming up with "WARNING: System has recovered from an over-temperature condition" for no apparent reason. The system was not being stressed in any way.

First thing I did was to load Cpuid HWmonitor, it's an excellent tool to check the various temperature sensors throughout the system.  Running a 4k Youtube video quickly pushes the temperature to reach close to 100 degrees.

Upon inspection, the fan and heatsink were free of dust or other obstructions.  I also checked the bios settings for fan optimisations, setting the fan speed to "cool" really didn't make a big enough of a difference.

How to fix Intel Nuc - System has recovered from an over temperature condition

After spending many hours on this I came to the conclusion that the problem was not fixable an an RMA would be necessary. If you have this issue then get in touch with Intel to arrange an RMA - if your NUC is still under warranty.

If your NUC is no longer covered by the Intel warranty then you can get passed the problem by disabling the Intel turbo boost option in the Bios.

Enter the Bios using the F2 key at startup then navigate to Advanced and uncheck the "Use Turbo Boost" option.


Windows Blue Screen When Printing To Kyocera

Windows users across the globe that use Kyocera printers have had a blue screen pop up when trying to print after installing Windows update - KB50000802.

Windows updates - got to love em. If they don't steal your time loading and slowing down your pc they add blue screen errors to the list. Although essential to the security and stability of our Windows pc's, the last thing you expect is for it to cause instability.

Windows users that installed the Windows "KB50000802" update will get a blue error screen. The blue screen stop code "APC_INDEX_MISMATCH" "Win32kfull.sys" comes after trying to print to any of several models of Kyocera printers.  The error can not be resolved by updating the Kyocera printer driver.

How to fix "APC_INDEX_MISMATCH" Windows blue screen error

The fix is pretty simple really, just uninstall the Windows update "KB50000802"

Do this by going to "Settings" click on "Update & Security" click on "Windows Update"

Click on "View update history"

Check to see if the update "KB50000802" is listed, if it is, move to the next step.

Click on "Uninstall updates"

Select "Security update for Microsoft Windows (KB50000802)" then click on uninstall.


Once the update has been uninstalled you will be prompted to restart your computer.

As a further step I recommended to pause updates for a while until Microsoft releases a fix.

On the "Windows Update" screen go to "Advanced options"

Go to the "Pause updates" section

Choose a future date to pause updates until that day. I suggest two or more weeks.


Best Value CPU Air Cooler

A while back I had to put together a mid range gaming computer for a client, the client had a set budget in mind and I had to spec out a good bang for buck gaming computer. The client's only demand was that the cpu had to be an Intel i7 10700.

The parts list included: Intel i7 10700, H470M motherboard, 16GB DDR4 2600Mhz memory, GeForce RTX 3070, 650 Watt PSU and a Samsung 1TB M.2 NVMe SSD drive. The build was an absolute pleasure, everything went together like a glove. I assembled the system with the stock Intel cpu air cooler that came included with the Intel i7 10700 cpu.

Stock Intel i7 10700 CPU Cooler

The Intel i7 10700 desktop cpu is an 8 core 16 thread, 2.9GHz clocked cpu that can turbo boost to 4.80GHz and in the process consume up to 215 Watts under full turbo boost load. The 14nm Comet Lake processor has a max die temperature of 100 degrees C. The included cooler is certainly good enough to run at the processor 65 Watts TDP but not more, when turbo boost kicks in  the cpu die reaches 100 degrees C in mere minutes. 

When it came to testing the system, I ran a few benchmark applications but my go to was Call Of Duty Warzone as this game is CPU and GPU intensive. After a few minutes it was evident that the stock cooler is NOT sufficient. The cpu was cooking, the cpu package temperature was running at 93 degrees C! "CPUID Hardware Monitor" recorded max temperature hitting 100 degrees C - That's the Cpu max temperature as per the Intel specifications!

Best Value CPU Air Cooler - Cooler Master Hyper 212X CPU Cooler

The Cooler Master Hyper 212X CPU Cooler comes with all the necessary mounting gear, thermal paste and even a tool for tightening the bolts that are included in the box.

I swiftly removed the stock intel cpu cooler and replaced it with a Cooler Master Hyper 212X CPU Cooler. Mounting the cooler was fairly straight forward and the entire process took about 10 minutes. The Cooler Master Hyper 212X CPU Cooler 212X is amazing value for money. Running Call Of Duty Warzone with the same settings in the same ambient temperature of 26 Degrees C see the temperature drop down to a respectable CPU package temperature of 71 Degrees C, that's a massive 22 Degree C difference! Very impressive for the price!


Reolink Argus 2 IP Security Camera

Some years back I had an attempted break in on my property which prompted me to look into an IP security camera. I did not want to spend a load of cash and wanted something basic. I settled on and  installed a Sannce IP camera to monitor street view access into my property.

From the get go I had issues with the Sannce App not connecting and draining my cellphone battery a lot quicker than it should. I did some tinkering and found that the Sannce IP camera can be accessed via web interface, therefore negating the need for the App.

Accessing the Sannce camera worked ok but there were functions that were not working well with the camera. Playing back automated recordings was a pain in the butt, I was never satisfied with how it all worked.

Fast forward a couple of years and I finally decide to look at a different camera. I had some specific criteria for the new IP security camera:

  1. Should be easy to install
  2. Does not require any wiring
  3. Works off Wi-Fi
  4. Can record locally to an SD card
  5. Has an easy to use app that DOES NOT require monthly subscriptions
  6. Should have good image quality
  7. Automatically records on motion detection
  8. Send alerts on motion detection

Reolink Argus 2 IP Security Camera

I have read countless reviews on various IP cameras, my decision  was to go with the battery operated Reolink Argus 2 IP security camera. The Argus 2 is a 1080p full HD camera fitted with the new Sony Starlight 2MP cmos sensor that allows clearer night vision. The camera comes with a detachable 5200MaH rechargeable battery.

What I like about this camera is that there is NO NEED for subscriptions to view the live feed or recordings!

Features of the Argus 2 IP Camera

  • Full HD 1080P
  • 100% wire free
  • Indoor/Outdoor Use
  • Removable rechargeable battery
  • Starlight night vision Sony CMOS sensor
  • Smart P.I.R sensor
  • Two way audio
  • Wide 130 degree viewing angle
  • Motion recording to SD card
  • Live view anytime without the need for subscriptions
  • Motion sensing recording without the need for subscriptions
  • Option to enable alarm on motion detection

Reolink IP Camera No Subscription Required To Playback Recordings

As mentioned before, one of the deciding factors for me was to have a IP security camera where I did not have to pay any subscriptions to be able to view recordings. The Reolink App requires you to create an account to be able to login to your camera. Recordings are stored on an up to 64GB SD card and as an optional extra you can sign up to the Reolink cloud storage offering.

The Reolink App is user friendly and intuitive. If the PIR motion sensor push notification is enabled, you will get notifications directly to your phone notification area.

I especially like the attention that went in to the playback section. Recordings are kept on a timeline, and can be viewed easily by selecting a time and then using the play option. The user has the option to download videos or to take screenshots of scenes.

The Reolink Argus 2 is an easy to install and use battery operated IP security camera that comes in at a very competitive price and packs oodles of features.

I have had the Reolink Argus 2 for exactly a month. The battery as of writing this is sitting at 57%. Naturally, I have done a lot of testing so the battery could potentially go for two to three months in my use scenario.

I am very happy with the Argus 2 and it gets my recommendation.

Buy it from Amazon.